- Published on
Create vector tiles with tippecanoe
- Authors

- Name
- YuChun Tsao
In this article, I use felt/tippecanoe to create vector tiles. Because this fork supports new features that you can use FlatGeobuf as input and PMTiles as output.
However, some features are still under development. If you don't need new features, you can use mapbox/tippecanoe to create vector tiles with MBTiles as output.
Environment
- tippecanoe v2.17.0
- GDAL 3.5.1
- Ubuntu 22.04
Installation
git clone https://github.com/felt/tippecanoe.git
cd tippecanoe
make -j
make install
Input data
You can use GeoJSON, Geobuf, CSV and FlatGeobuf (only felt/tippecanoe repository) as input format to create vector tiles.
In the previous article (Import OSM data through osm2pgsql flex output) , I use osm2pgsql flex output to import OSM highway data into PostGIS. This article will use these data as input source to create vector tiles.
Export FlatGeobuf from PostGIS through GDAL
I want to use FlatGeobuf as input format to tippecanoe. Because FlatGeobuf format has better performance than GeoJSON when reading and writing, and the file size is smaller.
More information about FlatGeobuf.
There are many different values under OpenStreetMap Key:highway to identify different roads. You can design layers and columns according to your needs.
In the following example, the motorway and motorway_link is filtered from the Key:highway through ogr2ogr and saved in Flatgeobuf format.
The type column in highway table is defined in the lua file when I import the data through osm2pgsql.
ogr2ogr \
  -f "FlatGeoBuf" \
  ./data/motorway.fgb \
  PG:"host=localhost dbname=osm user=yuchun password=my-password port=5432" \
  -sql "select * from highways where type in ('motorway', 'motorway_link');"
You can also pre-process the data at this stage. (Simplification, attribute calculation...)
Create vector tiles from FlatGeoBuf
tippecanoe has many options to generate vector tiles. You can refer to the official documentation to set options to custom your vector tiles.
Output to MBTiles
tippecanoe \
  --force \
  -Z6 \
  -z14 \
  --coalesce-densest-as-needed \
  ./data/motorway.fgb \
  -o ./data/motorway.mbtiles \
  -l "highways"
Output to PMTiles
tippecanoe \
  --force \
  -Z6 \
  -z14 \
  --coalesce-densest-as-needed \
  ./data/motorway.fgb \
  -o ./data/motorway.pmtiles \
  -l "highways"
Output to directory
tippecanoe \
  --force \
  -Z6 \
  -z14 \
  --coalesce-densest-as-needed \
  ./data/motorway.fgb \
  -pC \
  -e ./motorway_tiles \
  -l "highways"
Using your vector tiles in QGIS
MBTiles
If you output vector tiles as MBTiles, you can use tileserver-gl-light to host your MBTiles.
tileserver-gl-light ./data/motorway.mbtiles
The ZXY URL is http://localhost:8080/data/motorway/{z}/{x}/{y}.pbf
You can install
tileserver-gl-lightwithnpm install -g tileserver-gl-light.
If you want to change more behavior abouttileserver-gl-light, you can follow TileServer GL documentation . The documentation has example about configuration file.
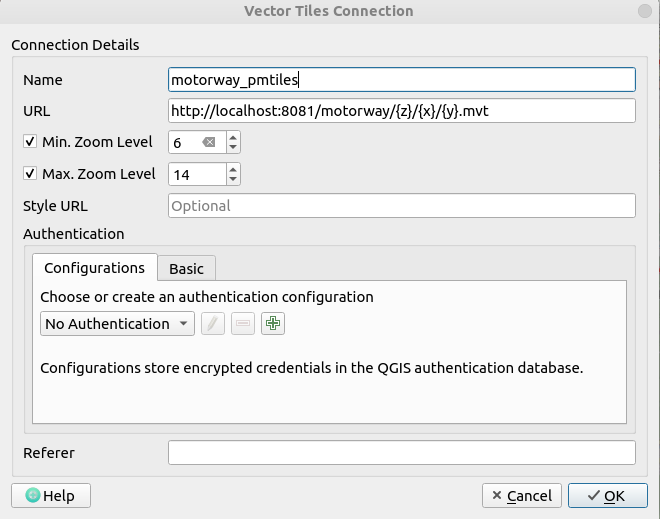
PMTiles
If you output vector tiles as PMTiles, you can use go-pmtiles to serve your directory of archives.
pmtiles serve ./data --port=8081
The URL is http://localhost:8081/motorway/{z}/{x}/{y}.mvt
You can download
go-pmtilesfromreleases page.
Directory
If you output vector tiles to directory, you can use http-server or other HTTP server to host it.
# Output directory
http-server --port 8082 ./motorway_tiles
The URL is http://localhost:8082/{z}/{x}/{y}.pbf
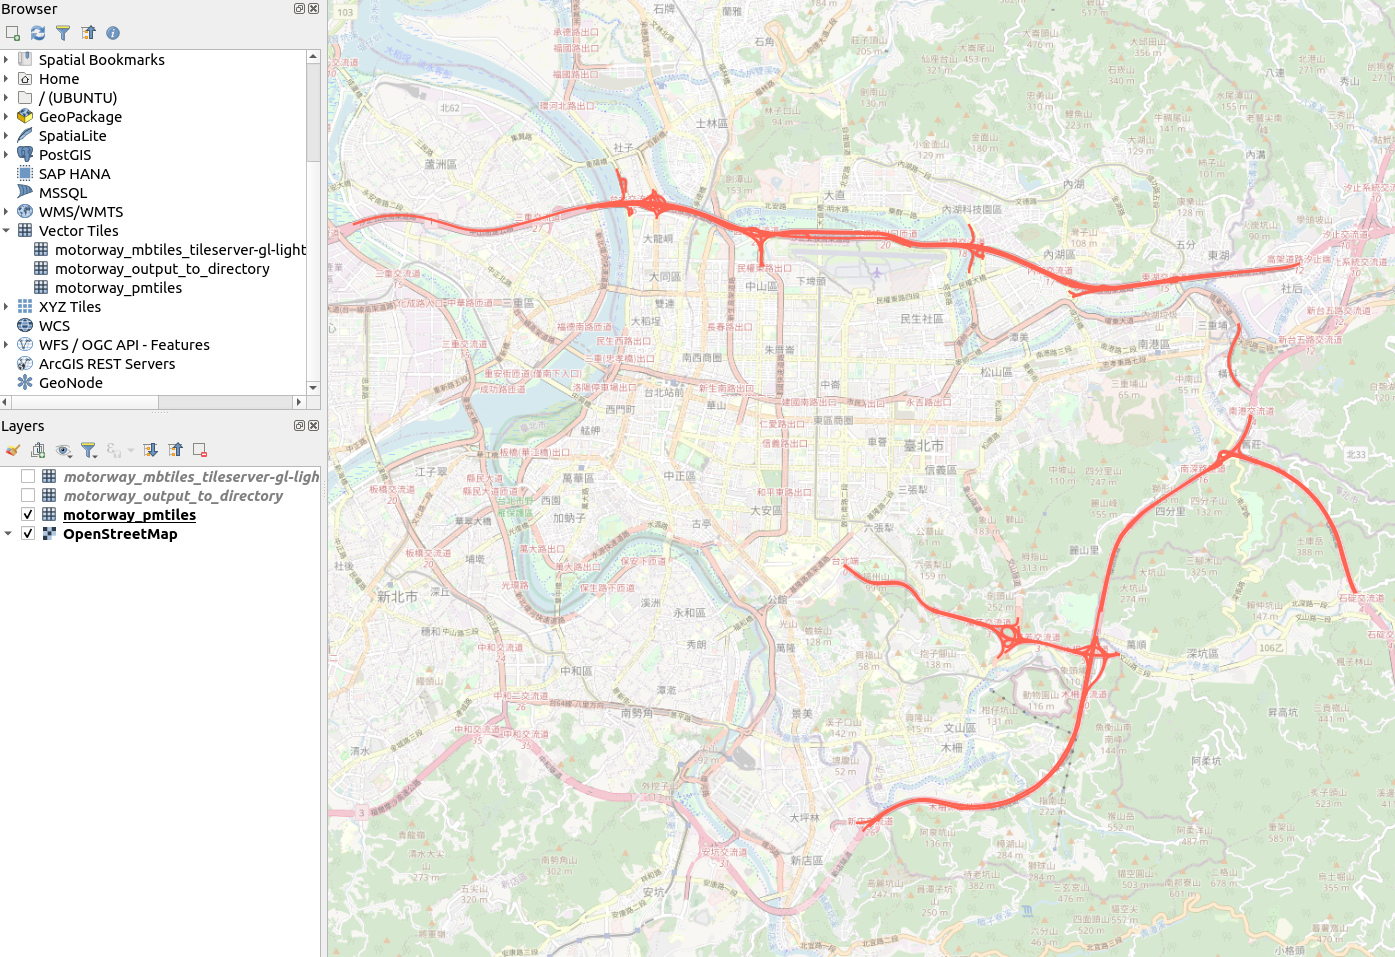
Open your vector tiles in QGIS
Set the URL in QGIS to access your tiles.
You can also create a
style.jsonto define layer style with mapbox style specification.
Add this layer into map.